
You start creating content for your brand. The first step? You grab your phone or camera, hit record, and start shooting. In the beginning, you stick with auto mode. It’s easy. You focus on your product, yourself, and the vibe you want to create. For a while, it works fine… until it doesn’t.
Some shots look amazing. Others fall flat. You didn’t change anything, yet the quality changes from one shot to the next. That’s when you realize: you’re not the one in control. The camera is. And that’s the problem.
If you want your photos and videos to look consistently clean, sharp, and professional, you can’t let the camera make all the decisions. You need to take control.
That means learning manual mode. And manual mode boils down to one thing :
the exposure triangle.
 Book a content analysis here
What Is the Exposure Triangle?
Getting a well-exposed photo isn’t about luck, it’s about control. The exposure triangle is the foundation of that control.
It’s not as intimidating as it sounds. The triangle simply refers to the relationship between three camera settings that determine how bright or dark your image will be:
- Aperture
- Shutter speed
- ISO
These three elements work together to shape not only the exposure, but also the look and feel of your shot. Change one, and you’ll usually need to adjust at least one of the others to keep the exposure balanced.
Think of it like cooking. If you add more salt, you might need to adjust the sweetness or acidity to keep the dish balanced. The same principle applies to photography.
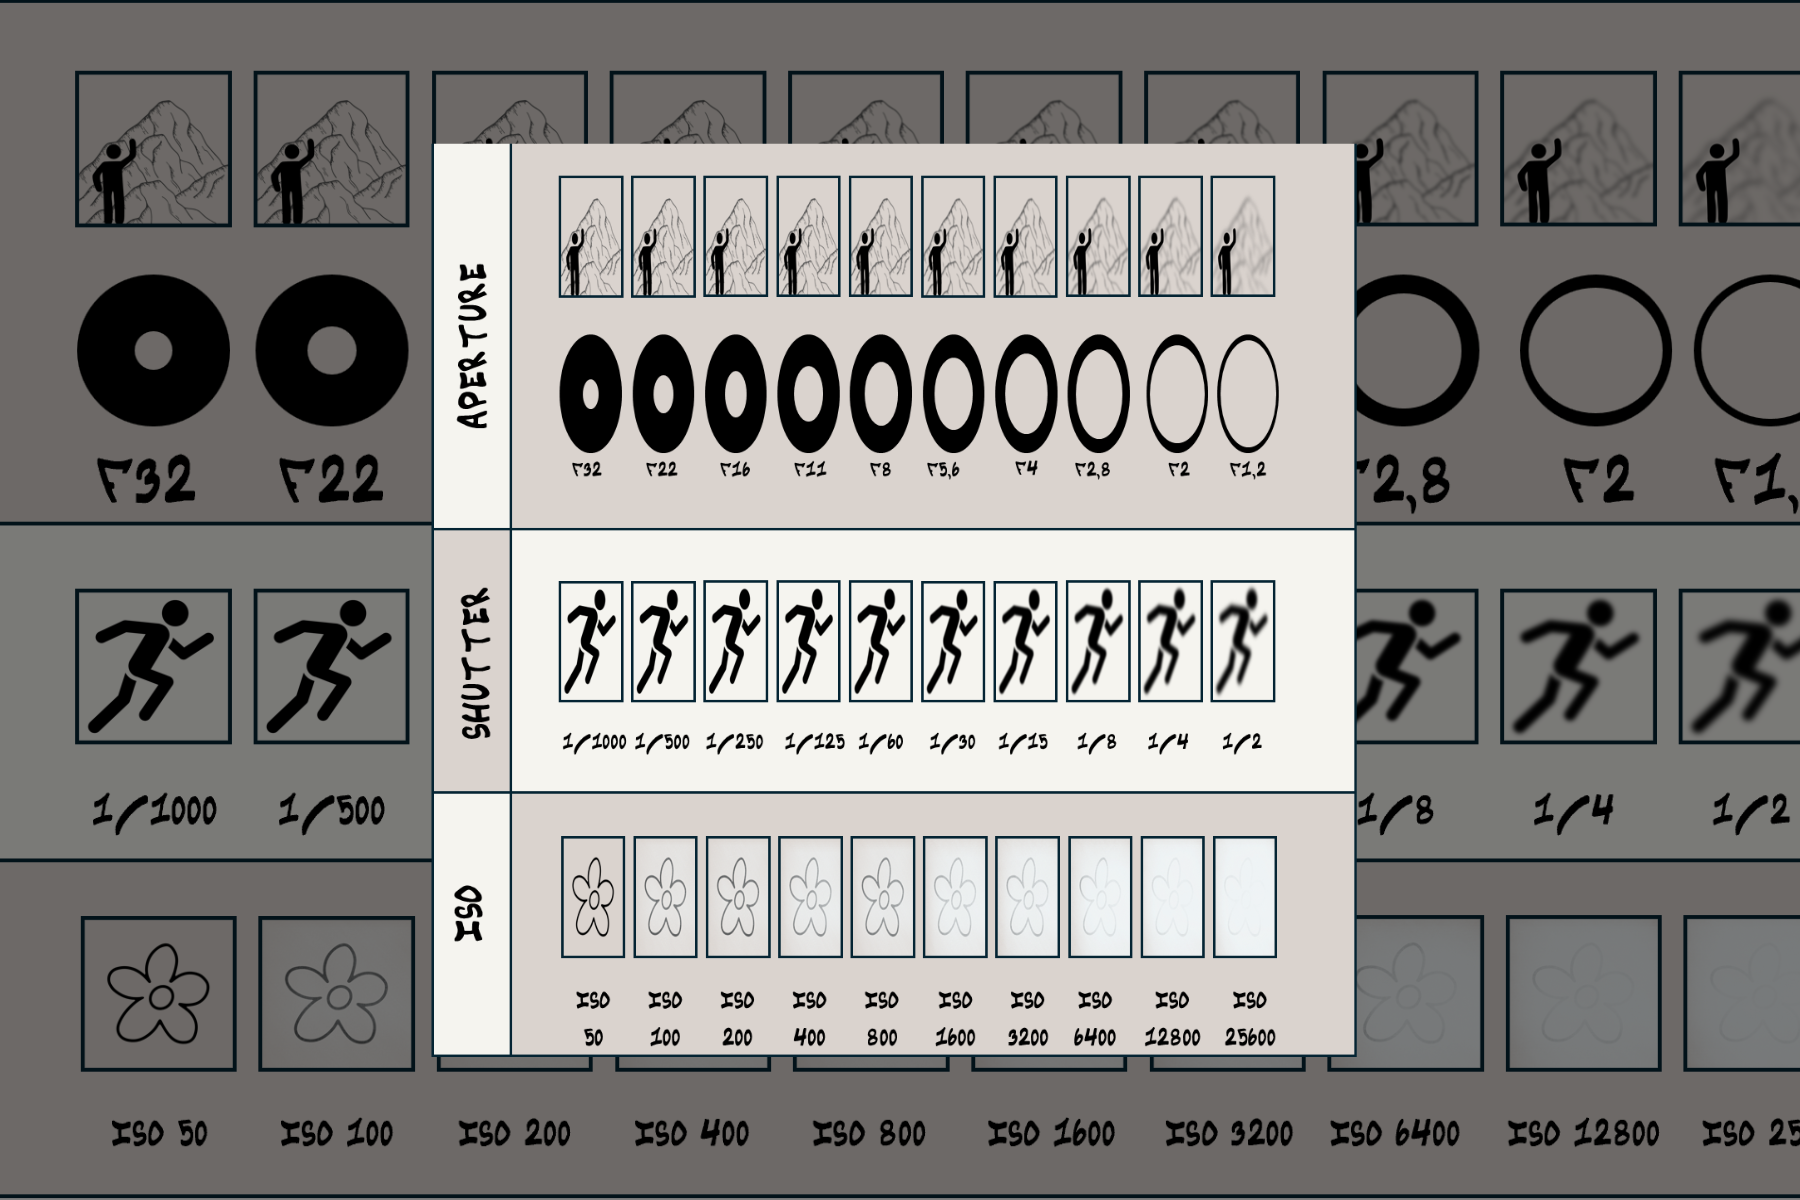
Aperture: How Much Light Gets In
Aperture is the size of the opening in your lens. It’s measured in f-stops, numbers like f/1.8, f/4, f/8, and so on.
A wide aperture (small f-number, like f/1.8) lets in more light and gives you a shallow depth of field, that creamy, blurred background that makes your subject pop. A narrow aperture (large f-number, like f/11) lets in less light but keeps more of the scene in focus.
If you’ve ever wondered how portrait photographers get that beautiful separation between their subject and the background, that’s often thanks to a wide aperture.
The trade-off? More light means less of the scene is sharp. If you’re shooting a big group of people and you want everyone’s face in focus, you’ll need a narrower aperture, even if that means letting in less light.
Shutter Speed: How Long Light Stays In
Shutter speed is how long your camera’s sensor is exposed to light. It’s measured in fractions of a second, 1/60, 1/250, 1/1000, or in whole seconds for long exposures.
A fast shutter speed freezes motion, perfect for sports or capturing someone mid-jump. A slow shutter speed allows for motion blur, which can be artistic, think of smooth, flowing waterfalls or light trails from passing cars.
But here’s the catch: a slow shutter speed also means you need to hold the camera steady, or your entire image might blur. Without a tripod, anything slower than about 1/60 risks camera shake.
The trade-off here is between light and motion. Faster shutter speeds let in less light but keep motion crisp. Slower speeds let in more light but can blur movement.
ISO: How Sensitive the Sensor Is
ISO controls your camera sensor’s sensitivity to light.
A low ISO (like 100) keeps your image clean and sharp but needs more light. A high ISO (like 3200) brightens your shot but introduces digital noise, those tiny speckles you see in darker images.
Think of ISO like turning up the volume on a speaker. Turn it up too high, and you start to hear static. The goal is to keep ISO as low as possible for the situation, balancing it with aperture and shutter speed.
How the Three Work Together
Here’s where it all comes together: the exposure triangle is a balancing act.
If you widen the aperture to let in more light, you might need a faster shutter speed to prevent overexposure, or a lower ISO.
If you slow your shutter speed to capture more light, you may need to narrow the aperture or lower the ISO to keep things balanced.
If you raise ISO to brighten a dark scene, you can often use a faster shutter speed or narrower aperture, but risk introducing noise.
Example:
You’re shooting indoors in natural light. Your settings are:
- Aperture: f/2.8
- Shutter speed: 1/125
- ISO: 400
If you want a brighter image without touching aperture, you could slow the shutter speed to 1/60, but that might blur if your subject moves. Alternatively, you could raise ISO to 800, brighter, but with a little more grain.
Why Manual Mode Changes Everything
When you shoot in auto, your camera constantly makes these decisions for you, and it’s guessing based on the scene. That’s why your results can be inconsistent.
In manual mode, you decide what matters most for the shot. Need a blurred background? Set a wide aperture and adjust shutter speed and ISO accordingly. Want everything in focus for a landscape? Narrow the aperture and adjust the other settings to match.
Once you understand the triangle, you can predict exactly how your shot will look before you press the shutter. Same light. Same settings. Same outcome, every time.
Getting Started With Manual
Switching from auto to manual doesn’t mean you have to go cold turkey. Start small.
- First, learn aperture priority mode, you control aperture, the camera adjusts the rest.
- Then try shutter priority, you control motion, the camera adjusts the rest.
- Finally, move into full manual, where you control all three settings.
Practice in the same lighting conditions so you can clearly see how changes affect the shot. Take the same photo at different apertures, shutter speeds, and ISOs. Compare the results.
Now that you understand the exposure triangle, it’s time to take control of your camera and start shooting in manual. Or skip the trial-and-error and let me shoot the content for you.
I’m always happy to deliver high-quality, consistent visuals that match your brand’s look every single time. Email me, ping me on WhatsApp, or grab a slot in my calendar here.
Let’s make your content look exactly the way you want, every single time.
Leave a Reply